
A Cooked (that’s right, NOT baked) Chocolate Cake with White Chocolate Butter Cream Icing and Chocolate Spiderwebs
As you may have noticed, we are not specialist bakers… What I find particularly worrisome about baking, is that only once everything is said and done, you find out it has all gone to hell. So, rinse and repeat… from scratch.
Cooking on the other hand, is more flexible. Adjust as you go. It is not that I oppose the idea of baking, but rather that I spend the entire ‘baking-period’ in a state of panic. Is it raising, correctly? Is it raising skew? Am I going to overcook it? Will it be burnt on the edges and raw on the inside? And then, when it is dry and crispy as the desert, what can you do. I’ll tell you what you can do; you can run across the road to the bakery and buy whatever you need. Then you lie. You lie about the grudge purchase, and then tell everyone it is a secret family recipe.
With a bit of time on your hands, you can even buy a pre-packaged mix, and microwave it to perfection- true story. As my dear friend Petri would tell you, this seemingly flawless scheme, is in fact very, very flawed. Especially when your soon to be in-laws insist on sharing that special bread recipe, that goes down like a house on fire at family gatherings!
On that note, I too swear by a specific brand of Super Moist microwaveable chocolate cake. When I can find it.
Recently a friend asked for a birthday cake for her 3-year-old grandson’s family birthday dinner. I was all set to bake a delicious chocolate-honey cake. Then disaster struck. With no notice, whatsoever, my oven fuse fizzled to non-existence. There was only one option… That reliable boxed microwaveable chocolate cake. As luck would have it, it was nowhere to be found. We settled on one of each of every other brand on the market.
This is how we built a bespoke chocolate microwave box cake; with a Spiderman theme.
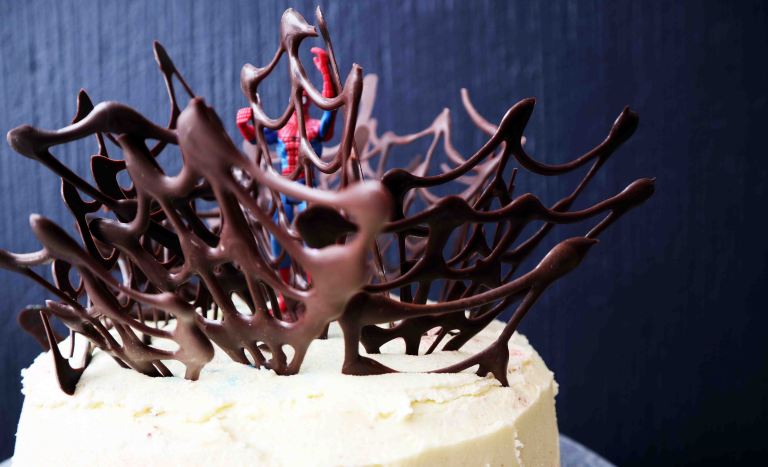
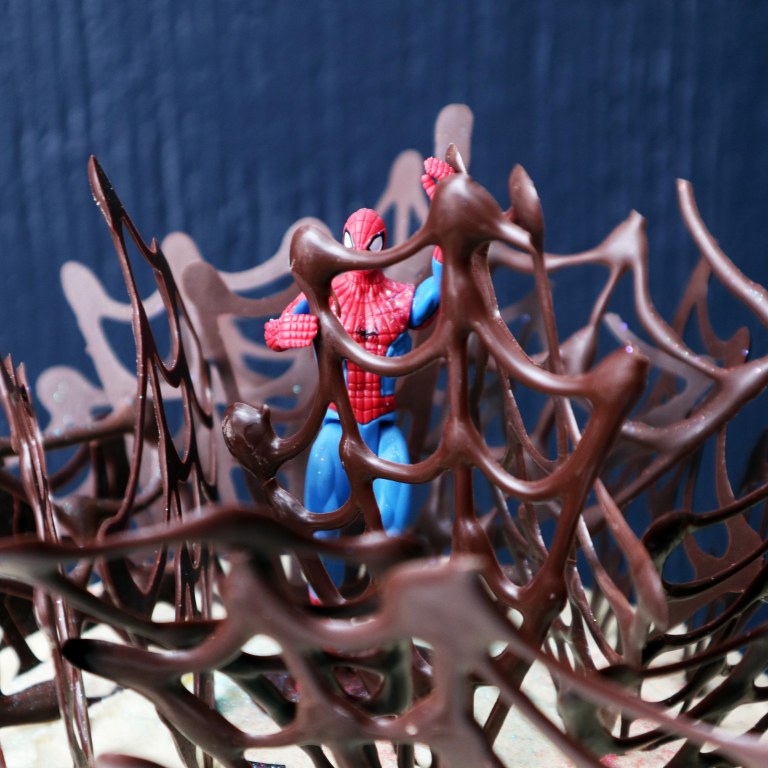
The idea was to bake chocolate; coat it with white chocolate butter cream icing; fill it with blue and red M&Ms; decorate it with chocolate spider webs- and a Spiderman.
You will need
- 1 box microwaveable chocolate cake mix.
- Additional ingredients as indicated on the box- typically all wet ingredients like eggs, oil/butter and milk.
Icing
- 3 slabs of your favourite white chocolate (±250g)
- 5 cups icing sugar
- 250 g room temperature butter
- 50ml milk (I used almond milk)
Decorating
- 3-4 large packs M&Ms (you’ll need about 1-1 ½ cup red and blue M&Ms/ Smarties/ Astros/ Skittles. We found M&Ms & Astros have the best colour)
- 500g high quality cooking chocolate (In short: edible cooking chocolate. We grew up with something that can best be described as brown coloured candle wax)
- A Spiderman action figure
Tools
- Microwaveable, cake ring pan
- Piping bag or soft silicone squeeze bottle (the softer the container, the easier to control the runny chocolate)
- Baking paper for the cake tin and chocolate spider webs.
- A broad blade knife or decorating pallet knife to apply the icing with.
- Metal bowls for melting chocolate.
Method
Spiderwebs
- If you’re not confident that you can draw freehand spiderwebs, consider placing printed spiderwebs underneath sheets of baking paper. Lay the sheets of baking paper out on a flat work surface.
- Melt 2 cups of chocolate (I prefer the double boiler method. Use a glass or or metal bowl, placed over simmering water on the stove. Make sure your bowl does not touch the water.) Stir the chocolate over the heat until the chocolate is almost completely melted.
- Remove from heat, and stir in a third cup of chocolate to help bring the temperature down, and thicken the chocolate just a bit.
- Pour the melted chocolate into a piping bag/ silicone cake decorator. (If the mixture is too runny, let it sit for a moment to cool down. During my first attempt, my chocolate was too hot, and super runny… I ended up making chocolate spider-blobs. Think Spiderpig…)
- Using your piping bag or cake decorator, draw spiderwebs on the sheets of baking paper. If you’re using a template, you can move the print around as you move from one ‘chocolate drawing’ to another. (Don’t sweat the small stuff. You have lots of extra chocolate to practice with =)
- Once your drawings are complete let the set- these can be made in advance. They keep really well at room temperature if you use pre-tempered cooking chocolate.


Cooking the Cake
- Follow the instructions as indicated on the box. Some recipes require that the mixture be microwaved, stopped, and heated again. Others cook in one 8-12 minute go.
- Allow the cake to cool before removing it from the cake tin.
- Make sure it is absolutle cool before icing it… Butter cream icing has a tendency to become a goopy mess when applied to warm pastries.


Preparing the Icing
- Let the butter come to room temperature before mixing in the icing and milk.
- Using the double boiler method, melt your favourite white chocolate. Using a spatula or wooden spoon, combine the melted chocolate with the icing and butter mixture.


Building Your Cooked Cake
- Slice the cake to create two layers. If like me, you don’t have a nifty device to to make sure that the cake is cut level throughout, use icing sugar to make 3 marks on the side of the cake, to help you line it up gain later. Lift the top layer with 2 egg lifters or spatulas, and set aside.
- Make sure the cake is cooled throughout before applying a layer of icing on the bottom layer.
- Place the top layer of the cake back on the bottom half, making sure the icing marks on the side line up.
- Melt the remaining melting chocolate and coat the inside ring of the cake. This will protect the M&Ms from from the moisture of the cake, and ensure that they stay crisp and colour fast until you cut it. If your chocolate is too runny, and runs all the way down without covering the cake, give it a moment to cool down. Use a teaspoon to drizzle the slightly thicker mixture over the inside ring of the cake until completely covered.
- With the left over melted chocolate, create a round disc, the size of the top opening of the cake’s center ring. This will protect the M&Ms from the moisture of the icing, and keep all the candy loose and separate.
- Apply the icing using a broad knife or decorating spatula, leaving the center opening free from icing.
- Pour the M&Ms into the center cavity. Close the opening with the chocolate disc, and cover with icing.
- Place the figurine in the center of the cake. Carefully arrange the chocolate spiderwebs around the figurine by gently pushing them into the top surface of the icing. If you’re a little forceful, the webs may snap, but not to worry, you should have tons of extras to work with.
- If you’re so inclined, feel free to sprinkle with food grade glitter or additional Spiderman memorabilia.


Best of luck with cooking a cake- it most certainly is one of my favourite kitchen cheats 😉

WOw! i love chocolate immensely! Thanks you so much for sharing this recipe. This post touched my heart. You give us a new way to celebrating happiness.
LikeLike
You’re welcome! It’s a cheeky shortcut, but I’m all for faster gratification when it comes to chocolate, or cake 😛
LikeLike